As the seasons shift, your window air conditioner becomes either a beacon of cool relief or a silent energy drain. Many homeowners unknowingly sacrifice comfort and money due to unsealed gaps around their AC units. These seemingly small openings allow precious cooled air to escape while inviting hot, humid air, dust, allergens, and even pests into your home. Properly sealing your window AC unit is a straightforward DIY task that not only boosts your cooling efficiency but also significantly lowers your energy bills, creating a more comfortable and healthier indoor environment. It’s time to take control of your home’s climate and ensure your AC works smarter, not harder.
Understanding the Importance of Sealing Your Window AC Unit
A window air conditioner’s primary purpose is to cool your living space, but its effectiveness is severely compromised if not properly installed and sealed. The very act of placing an AC unit in a window creates potential pathways for air exchange between your home’s interior and the outdoors. This exchange means your AC unit constantly struggles to maintain the desired temperature, leading to longer run cycles and increased electricity consumption.
Historically, window AC units often came with flimsy accordion panels that left significant gaps, but even modern units can have slight imperfections in their fit. Over time, these gaps can worsen due to vibrations or wear, turning your cooling efforts into a losing battle against the elements. Beyond energy waste, these unsealed areas invite unwanted elements into your sanctuary, from buzzing insects and irritating dust to outdoor noise. Addressing these vulnerabilities not only secures your home’s envelope but also extends the life of your AC unit by reducing the strain on its internal components.
Essential Tools and Materials for DIY AC Sealing
Before you begin your sealing project, gathering the right tools and materials is crucial for a smooth and effective process. Most of these items are readily available at any hardware store, making this a truly accessible DIY endeavor.
Key Tools You’ll Need:
- Utility Knife or Scissors: For cutting insulation materials to size.
- Measuring Tape or Ruler: To ensure accurate cuts and fits.
- Caulk Gun: If you plan to use caulk for more permanent seals.
- Cleaning Supplies: Rags, a brush, and a mild cleaner to prepare surfaces.
- Flashlight: To help identify hidden gaps and cracks.
|
Our Picks for the Best Air conditioner in 2026
As an Amazon Associate I earn from qualifying purchases.
|
||
| Num | Product | Action |
|---|---|---|
| 1 | Shinco 8,000 BTU Portable Air Conditioner, AC Unit with Built-in Cool, Dehumidifier & Fan Modes for Room up to 350 sq.ft, Conditioner Remote Control, 24 Hour Timer, Installation Kit |

|
| 2 | 12000 BTU Portable Air Conditioner, 3-in-1 Portable AC Unit with Cooling, Dehumidifier and Fan Modes, Cools Up to 450 Sq.Ft, LED Display Air Conditioners with Window Kit and Remote Control |
|
| 3 | Midea 5,000 BTU EasyCool Small Window Air Conditioner - Cool up to 150 Sq. Ft. with Easy-to-Use Mechanical Controls and Reusable Filter, Perfect for Small Bedroom, Living Room, Home Office |
|
| 4 | Midea 12,000 BTU U-Shaped Smart Inverter Window Air Conditioner–Cools up to 550 Sq. Ft., Ultra Quiet with Open Window Flexibility, Compatible with Alexa/Google Assistant, 35% Energy Savings (Renewed) |
|
| 5 | LEVOIT Tower Fan for Bedroom, 90° Oscillating Standing Fan with 28dB Quiet for Sleep, 25ft/s Velocity, 12H Timer, 5 Speeds 4 Modes, Remoter, Bladeless Room Fan for Home, Office, Indoor, 36 inch, White |
|
| 6 | Feelfunn 8,000 BTU Portable Air Conditioner - 3-in-1 Portable AC Unit for Rooms Up to 350 Sq. Ft., with Remote Control, Cooling, Dehumidifier & Fan Modes, AC Unit for Bedroom, Office, Apartment |
|
| 7 | Frigidaire 5,000 BTU Window-Mounted Air Conditioner, Cools Up to 150 Sq. Ft., Quiet Operation, Effortless Temperature Control, 2 Fan Speeds, Auto Restart, White |
|
| 8 | Amazon Basics 5000-BTU Window Air Conditioner with Quiet Operation, Up to 150 Sqf, Cool and Fan Functions, Washable Filter, Adjustable Window Kit, Intuitive Mechanical Controls, for Small Room, White |
|
| 9 | Midea 8,000 BTU U Shaped Smart Inverter Window Air Conditioner - Cools 350 Sq Ft, Ultra Quiet with Open Window Flexibility - Alexa/Google Assistant Compatible - 37% Energy Savings, Remote (Updated) |
|
| 10 | Amazon Basics 6000-BTU Window Air Conditioner with Quiet Operation, Up to 250 Sqf, Cool and Fan Functions, Washable Filter, Adjustable Window Kit, Digital Temperature Display, Remote Control, White |
|
Essential Sealing Materials:
- Foam Insulation Strips/Tape: These self-adhesive strips are excellent for filling small to medium-sized gaps between the AC unit and the window frame. They are easy to cut and apply, providing a quick and effective barrier against air leaks.
- Weatherstripping: Ideal for sealing movable window sashes and preventing drafts where the upper and lower window frames meet, or around the AC unit’s accordion panels. It comes in various forms, including foam, rubber, and felt, offering flexible solutions for different gap sizes.
- Caulk: For more permanent solutions, caulk is indispensable for sealing small cracks (typically less than 1/8 inch) around the exterior edges of the AC unit where it meets the window frame or house siding. Silicone caulk is highly recommended for its waterproofing capabilities and flexibility, while latex caulk is paintable and easy to apply. Ensure conditions are dry and above 40°F (4°C) for optimal drying.
- Insulation Boards (Rigid Foam or Polystyrene): For larger, more significant gaps, especially on the sides of the AC unit where accordion panels might be insufficient, rigid foam or polystyrene boards offer superior insulation. They can be cut to fit precisely and wedged into place. Plywood can be an emergency substitute, but foam is preferred for its insulating properties.
- HVAC Tape or Duct Tape: HVAC tape, often aluminum-backed, provides a durable, temperature-resistant seal for seams and joins, particularly on the metallic parts of the AC unit or window frame. Standard duct tape can be used for temporary fixes or to secure other materials, though it may not offer the same longevity or aesthetic appeal.
- Clear Plastic Film Kits: These kits can cover the entire window area, creating an additional insulating layer that reduces drafts and improves overall window performance, especially useful for seasonal sealing.
- Window AC Side Panels/Kits: Many AC units come with accordion-style side panels. If yours are damaged or insufficient, consider specialized window AC seal kits that include improved panels or foam inserts designed for a snugger fit.
Choosing the right combination of materials depends on the size and location of your gaps, your climate, and whether you need a temporary or long-term sealing solution.
Step-by-Step Guide: How to Seal Your Window AC Unit
Achieving an airtight seal around your window AC unit is a straightforward process that can be completed with basic DIY skills. Follow these steps for maximum efficiency and comfort.
Prepare the Area
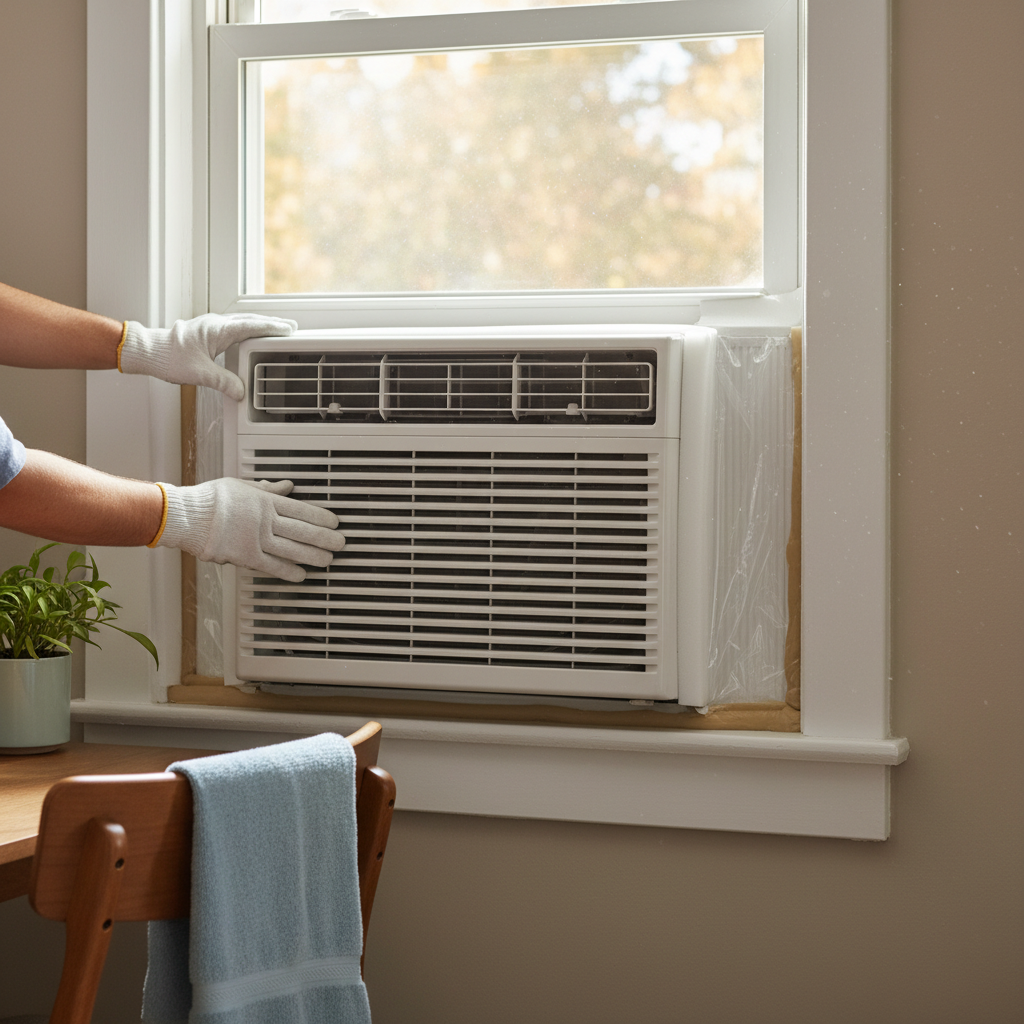
Safety comes first. Always turn off and unplug your air conditioner before beginning any work. Once the unit is powered down, gently pull it back slightly from the window opening if possible, allowing access to the sides without completely removing it from its bracket. Next, thoroughly clean all surfaces around the window frame, the window sashes, and the exterior casing of your AC unit. Use a brush or rag to remove any dirt, dust, or debris. A clean surface ensures better adhesion for any tapes or sealants you apply. Finally, inspect the entire area with a flashlight to identify all potential air leaks, no matter how small. Pay close attention to gaps where the AC meets the window frame, where the window sashes meet, and around the accordion panels.
Install Side Panels or Accordion Folds
Many window AC units come with built-in accordion panels designed to expand and fill the space between the unit and the window frame. Extend these panels fully and ensure they fit snugly against the window sashes. If these panels are old, damaged, or don’t provide a tight seal, consider upgrading to high-density foam boards or dedicated window AC insulation kits. Cut the foam boards to the exact dimensions of the gaps and wedge them firmly into place on either side of the unit. This creates a solid, insulated barrier where the accordion panels might fail.
Apply Foam Insulation Strips
For smaller gaps around the perimeter of the AC unit and where the window sashes meet, self-adhesive foam insulation strips are an excellent solution. Measure the length of the gaps you intend to seal and cut the foam strips accordingly. Carefully peel off the backing and press the foam firmly along the edges of the AC unit, the window frame, and any other areas where you detect drafts. Ensure complete coverage without overlapping excessively, which could prevent your window from closing properly.
Use Weatherstripping for Small Gaps
Weatherstripping is particularly effective for sealing the movable parts of your window, such as where the upper and lower sashes meet, or any small cracks around the window frame itself. Like foam strips, weatherstripping comes with an adhesive backing. Measure and cut the strips to fit, then apply them firmly to create a tight seal. This material is flexible and compressible, making it ideal for areas that experience movement or require a less permanent solution.
Seal with Caulk (For Permanent Solutions)
For external gaps and cracks that are less than 1/8 inch wide, caulk provides a durable and long-lasting seal. Choose a suitable caulk type – silicone for its excellent water resistance and flexibility, or a paintable latex caulk if you wish to match your home’s exterior color. Apply a steady, even bead of caulk along the outside edges where the AC unit meets the window frame and the window frame meets the house siding. Smooth the caulk with a wet finger or a caulking tool for a professional finish. Remember to check the caulk’s drying time and ensure the application is done in dry, moderate weather conditions.
Consider Insulation Boards or Plywood for Larger Gaps
If you have exceptionally large gaps that foam strips or weatherstripping cannot adequately fill, especially during the off-season or in extreme climates, insulation boards offer a robust solution. Rigid foam or polystyrene boards can be cut to fit these large voids, providing a significant thermal barrier. For a temporary or emergency fix, plywood can also be used, though it’s less insulating than foam and may require additional sealing around its edges. Secure these boards tightly, possibly with tape, to prevent movement and ensure a complete seal.
Secure with Duct Tape or HVAC Tape
To reinforce other sealing materials or to create a temporary seal, duct tape or HVAC tape can be very useful. HVAC tape is preferred for its durability and temperature resistance, making it suitable for sealing metallic components or securing insulation boards. Apply the tape smoothly over any seams or edges of your applied materials to ensure they stay in place and to add an extra layer of air-sealing. While effective, keep in mind that duct tape may leave residue if removed.
Common Sealing Mistakes to Avoid
Even with the best intentions, DIY projects can sometimes go awry. Avoiding common mistakes is key to a successful and long-lasting seal around your window AC unit.
- Not Cleaning Surfaces Thoroughly: This is one of the most frequent oversights. Dust, dirt, and old adhesive residue prevent new sealing materials from sticking properly, leading to premature failure of your seals. Always start with a clean, dry surface.
- Using the Wrong Materials for the Gap Size: Attempting to fill a large gap with thin weatherstripping, or trying to caulk a gap larger than 1/8 inch, will yield poor results. Match your material to the gap: thin strips for small cracks, foam boards for larger voids, and caulk for specific seams.
- Leaving Small Gaps Unsealed: Even tiny pinholes can allow a surprising amount of air to leak. Be diligent in your inspection and cover every potential pathway for air. A flashlight test is invaluable for spotting these elusive leaks.
- Over-Sealing or Restricting Movement: While a tight seal is good, applying too much caulk or using overly thick materials where they’re not needed can make it difficult to remove the AC unit later or even prevent your window from closing properly. Use only what’s necessary to create an effective barrier.
- Ignoring Exterior Gaps: Many people focus solely on the interior, but exterior gaps are just as crucial for preventing air and moisture infiltration. Caulk exterior seams to create a robust weather barrier.
- Not Testing for Leaks: After applying your seals, take a moment to test your work. You can do this by simply feeling around the sealed areas for drafts or using an incense stick; if the smoke wavers, you have a leak.
Benefits of Properly Sealing Your Window AC Unit
Investing a small amount of time and effort into sealing your window AC unit yields a multitude of benefits that extend far beyond simply keeping your home cool.
- Significant Energy Savings: This is arguably the most compelling benefit. By preventing cooled air from escaping and hot air from entering, your AC unit doesn’t have to work as hard or as long to maintain your desired temperature. According to experts, sealing these leaks can cut heating and cooling costs by as much as 20%. Less energy consumption directly translates to lower utility bills each month.
- Improved Cooling Efficiency: An unsealed AC unit is constantly fighting against drafts, diluting its cooling power. A proper seal ensures that all the cool air generated by your unit stays within your room, leading to faster cooling and more consistent temperatures. This means your home will feel more comfortable sooner and stay that way.
- Enhanced Indoor Comfort: Beyond just temperature, a well-sealed window AC unit contributes to overall indoor comfort. It eliminates uncomfortable drafts, reduces humidity infiltration, and maintains a stable climate, making your living space much more enjoyable.
- Pest and Allergen Prevention: Gaps around your AC unit are an open invitation for insects, spiders, and other unwelcome critters. Sealing these gaps creates a physical barrier, keeping pests out. Furthermore, a tight seal helps prevent pollen, dust, and other outdoor allergens from entering your home, leading to cleaner air and fewer allergy symptoms.
- Noise Reduction: Air leaks are not just about temperature; they also allow outdoor noises to seep into your home. A properly sealed AC unit acts as an acoustic barrier, muffling street sounds, barking dogs, and other disturbances, contributing to a quieter and more peaceful environment.
- Extended AC Unit Lifespan: When your AC unit doesn’t have to constantly overcompensate for air leaks, it experiences less wear and tear on its compressor and other vital components. This reduced strain can prolong the operational life of your unit, saving you money on repairs and premature replacements.
“A well-sealed window AC unit isn’t just about comfort; it’s a smart investment in your home’s energy efficiency and overall well-being. The small effort now pays dividends in savings and peace of mind.”
Conclusion
Sealing the windows around your AC unit is a simple yet incredibly effective DIY project that offers substantial benefits, from significant energy savings to enhanced comfort and improved indoor air quality. By addressing those unnoticed gaps and cracks, you empower your air conditioner to perform at its peak, transforming your living space into a truly refreshing sanctuary. Whether you opt for foam strips, weatherstripping, or a more permanent caulk solution, the effort you invest today will pay dividends in comfort and savings for seasons to come. Don’t let your cool air escape – take action to seal your window AC unit and enjoy a more efficient home.
What steps will you take to seal your AC unit and reclaim your comfort this season?
Frequently Asked Questions
What materials are best for sealing large gaps around a window AC unit?
For large gaps, rigid foam insulation boards (like polystyrene) are highly recommended. These can be cut to size and firmly wedged into the space, providing superior insulation and a solid barrier. Caulk should only be used for small gaps, typically under 1/8 inch.
How often should I check and reseal my window AC unit?
It’s advisable to check your window AC unit’s seals at the beginning of each cooling season. Over time, materials can degrade, shift, or lose their adhesion. Regular inspection and resealing as needed will maintain optimal efficiency and comfort.
Can sealing my window AC unit really save me money on energy bills?
Absolutely. Unsealed gaps allow cooled air to escape and warm air to enter, forcing your AC to work harder. By properly sealing these leaks, your unit operates more efficiently, which can reduce your heating and cooling costs by up to 20%, leading to noticeable savings on your utility bills.
Is it better to use temporary or permanent sealing methods?
This depends on whether you remove your AC unit seasonally. If you remove the unit each year, temporary solutions like removable foam strips, weatherstripping, or specialized window AC insulation kits are ideal. If the unit remains in place year-round, more permanent options like silicone caulk for exterior gaps can offer a longer-lasting seal.
Will sealing my AC unit also help with noise reduction and pest control?
Yes, a properly sealed window AC unit acts as an effective barrier against both outdoor noise and pests. By closing all gaps, you prevent sound waves from entering and eliminate entry points for insects and other critters, contributing to a quieter and more hygienic indoor environment.