As the warmth of the seasons approaches, your air conditioner becomes an indispensable ally against the heat. But like any workhorse, your outdoor AC condenser unit requires regular care to perform its best. Over time, this vital component can become a magnet for dirt, leaves, and debris, severely impacting its efficiency and potentially leading to costly breakdowns. Fortunately, giving your condenser unit a thorough cleaning is a manageable DIY task that can save you money, extend your system’s life, and keep your home comfortably cool.
Understanding Your Outdoor AC Condenser Unit
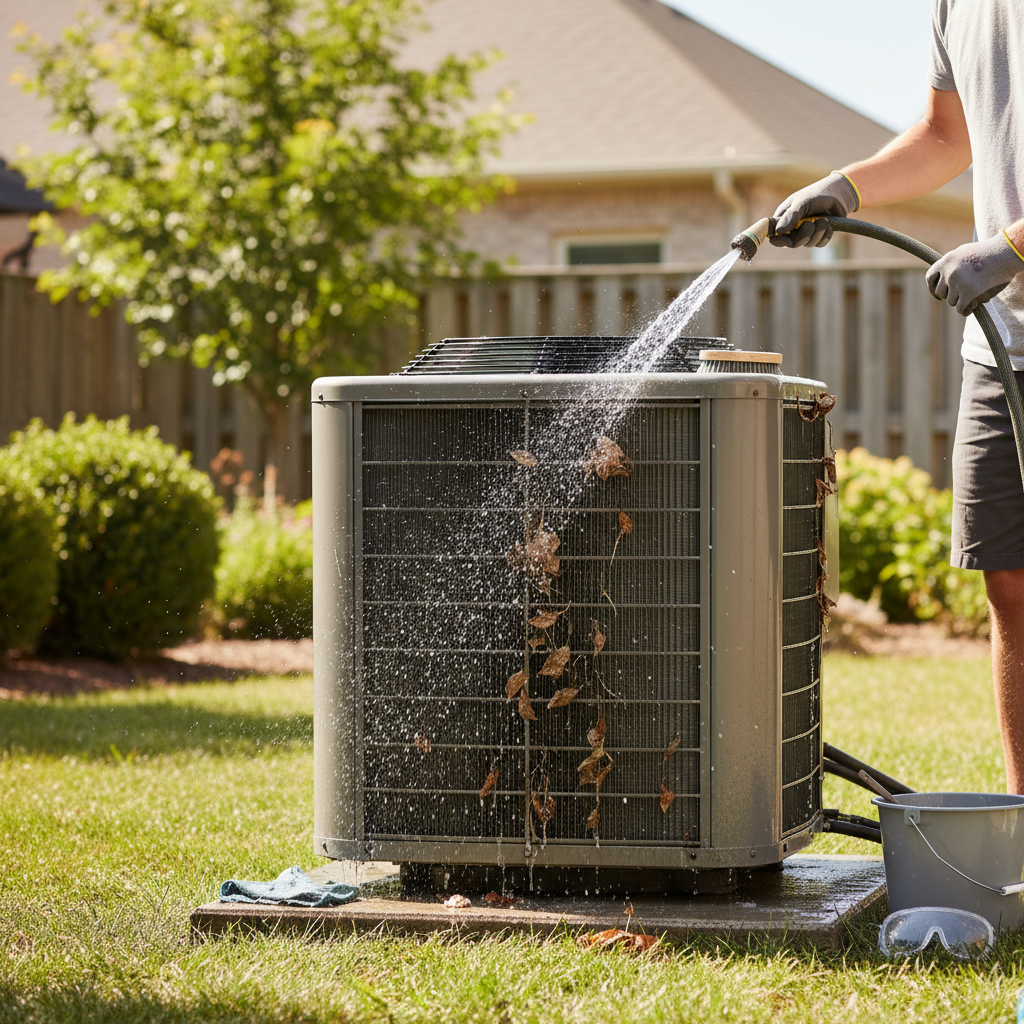
The outdoor AC condenser unit is the unsung hero of your home’s cooling system. Its primary role is to release the heat absorbed from your indoor air back into the outside environment. This crucial process involves a network of coils, typically made of copper, which are surrounded by delicate aluminum fins that maximize the surface area for heat exchange. A large fan inside the unit then draws air over these coils, facilitating the transfer of heat.
However, this constant interaction with the outdoors means the condenser unit is continuously exposed to environmental elements. Dust, pollen, grass clippings, leaves, and even pet dander can accumulate on the fins and coils. This buildup acts as an insulating layer, obstructing airflow and making it harder for the unit to dissipate heat effectively. When this happens, your AC system has to work overtime, straining its components and directly leading to higher energy consumption and diminished cooling capacity.
When and Why You Should Clean Your AC Condenser Unit
Maintaining a clean outdoor AC condenser unit isn’t just about aesthetics; it’s fundamental to its optimal performance and longevity. Ignoring this simple maintenance can lead to a cascade of problems that affect both your comfort and your wallet.
The Importance of Regular Cleaning
- Boosted Energy Efficiency: A clean condenser unit can transfer heat more effectively, meaning your air conditioner doesn’t have to work as hard to cool your home. Research indicates that a dirty outdoor unit can increase energy consumption by up to 30%, translating into significantly higher utility bills.
- Extended System Lifespan & Fewer Repairs: When the unit struggles to dissipate heat, its internal components, especially the compressor, are under increased stress. This added strain accelerates wear and tear, making breakdowns more likely and potentially shortening the overall lifespan of your expensive AC system. Regular cleaning mitigates this stress, helping components last longer and reducing the frequency of costly professional repairs.
- Improved Cooling Performance: Clogged coils restrict airflow and heat exchange, resulting in your AC unit blowing less cold air or struggling to reach your desired temperature. A clean unit ensures unhindered operation, providing consistent and effective cooling throughout your home.
- Better Indoor Air Quality: While the outdoor unit doesn’t directly filter indoor air, a well-maintained outdoor unit contributes to the overall health of your HVAC system. By keeping the outdoor environment around your unit free of excessive debris, you reduce the chances of contaminants being drawn into the system and potentially affecting indoor air quality.
|
Our Picks for the Best Air conditioner in 2026
As an Amazon Associate I earn from qualifying purchases.
|
||
| Num | Product | Action |
|---|---|---|
| 1 | Amazon Basics 6000-BTU Window Air Conditioner with Quiet Operation, Up to 250 Sqf, Cool and Fan Functions, Washable Filter, Adjustable Window Kit, Digital Temperature Display, Remote Control, White |

|
| 2 | 12000 BTU Portable Air Conditioner, 3-in-1 Portable AC Unit with Cooling, Dehumidifier and Fan Modes, Cools Up to 450 Sq.Ft, LED Display Air Conditioners with Window Kit and Remote Control |
|
| 3 | Shinco 8,000 BTU Portable Air Conditioner, AC Unit with Built-in Cool, Dehumidifier & Fan Modes for Room up to 350 sq.ft, Conditioner Remote Control, 24 Hour Timer, Installation Kit |
|
| 4 | Feelfunn 8,000 BTU Portable Air Conditioner - 3-in-1 Portable AC Unit for Rooms Up to 350 Sq. Ft., with Remote Control, Cooling, Dehumidifier & Fan Modes, AC Unit for Bedroom, Office, Apartment |
|
| 5 | Midea 5,000 BTU EasyCool Small Window Air Conditioner - Cool up to 150 Sq. Ft. with Easy-to-Use Mechanical Controls and Reusable Filter, Perfect for Small Bedroom, Living Room, Home Office |
|
| 6 | LEVOIT Tower Fan for Bedroom, 90° Oscillating Standing Fan with 28dB Quiet for Sleep, 25ft/s Velocity, 12H Timer, 5 Speeds 4 Modes, Remoter, Bladeless Room Fan for Home, Office, Indoor, 36 inch, White |
|
| 7 | Midea 8,000 BTU U Shaped Smart Inverter Window Air Conditioner - Cools 350 Sq Ft, Ultra Quiet with Open Window Flexibility - Alexa/Google Assistant Compatible - 37% Energy Savings, Remote (Updated) |
|
| 8 | Frigidaire 5,000 BTU Window-Mounted Air Conditioner, Cools Up to 150 Sq. Ft., Quiet Operation, Effortless Temperature Control, 2 Fan Speeds, Auto Restart, White |
|
| 9 | Amazon Basics 5000-BTU Window Air Conditioner with Quiet Operation, Up to 150 Sqf, Cool and Fan Functions, Washable Filter, Adjustable Window Kit, Intuitive Mechanical Controls, for Small Room, White |
|
| 10 | Midea 12,000 BTU U-Shaped Smart Inverter Window Air Conditioner–Cools up to 550 Sq. Ft., Ultra Quiet with Open Window Flexibility, Compatible with Alexa/Google Assistant, 35% Energy Savings (Renewed) |
|
Recommended Cleaning Frequency
For most homeowners, cleaning your outdoor AC condenser unit at least once a year is recommended, ideally in the spring before the cooling season begins. This proactive approach ensures your system is primed for peak performance when you need it most.
However, certain environmental factors and usage patterns may necessitate more frequent cleaning:
- Dusty Environments: If your home is near construction sites, dirt roads, or areas with significant airborne dust, cleaning every three to six months might be beneficial.
- Proximity to Trees: Units surrounded by trees that shed leaves, pollen, or seeds will accumulate debris faster.
- Pets: If you have furry friends that spend time outdoors near the unit, pet hair and dander can quickly clog the coils.
- Heavy Usage: Homes that run their AC units almost constantly during hot months may benefit from mid-season checks and light cleaning.
- Older Units: Older AC systems can be more susceptible to efficiency drops caused by dirt, making more frequent cleaning a wise practice.
Essential Tools and Safety Precautions for DIY Cleaning
Before you embark on cleaning your outdoor AC unit, gathering the right tools and prioritizing safety are paramount. A little preparation goes a long way in ensuring a safe and effective cleaning process.
Tools You’ll Need
- Screwdriver/Nut Driver: Essential for removing the access panels or grille that protect the condenser coils.
- Garden Hose with Spray Nozzle: For rinsing away loose debris and coil cleaner. Ensure the nozzle allows for a gentle, controlled spray, not a high-pressure jet.
- Soft-Bristled Brush: Ideal for gently sweeping away loose dirt and debris from the exterior and interior components. A specialized coil cleaning brush can also be effective.
- Vacuum Cleaner with Soft Brush Attachment (Optional): Useful for suctioning out lighter debris and dust from hard-to-reach areas within the unit.
- AC Coil Cleaner: A commercially available foaming or non-foaming cleaner specifically designed for air conditioner coils. These cleaners help break down stubborn grime. Alternatively, a mild solution of dish soap and water can be used for lighter cleaning.
- Fin Comb (Optional but Recommended): A specialized tool used to gently straighten bent aluminum fins, which are crucial for optimal airflow.
- Protective Gear: Always wear work gloves and safety glasses to protect your hands and eyes from debris and cleaning solutions. A dust mask can also be beneficial in very dusty environments.
Prioritizing Safety
Your safety is the most critical aspect of this DIY task. Neglecting proper precautions can lead to serious injury or damage to your unit.
“Safety should always be your top priority when working with electrical appliances. Disconnecting the power entirely is not just a recommendation; it’s a non-negotiable step to prevent electrical hazards.” – HVAC Technician, Reviewrnz.com
- Disconnect Power Safely: This is the most crucial step. First, switch your thermostat to the “off” position. Then, locate the electrical disconnect box near your outdoor AC unit (often a small grey box on the wall) and pull out the disconnect block or flip the switch. For absolute certainty, turn off the corresponding circuit breaker for your HVAC system in your home’s main electrical panel. Verify the power is off before proceeding.
- Wear Protective Gear: Always don gloves and safety glasses to shield yourself from sharp fins, chemical splashes, and flying debris.
- Inspect for Damage: Before you begin, visually inspect the unit for any frayed wires, leaks, or significant damage. If you notice anything concerning, it’s best to call a professional HVAC technician rather than attempting a DIY fix.
- Avoid Pressure Washers: Never use a high-pressure washer on your AC unit. The intense spray can easily bend the delicate aluminum fins, damaging them and severely impeding airflow, which can reduce efficiency more than the dirt itself. It can also force water into electrical components, causing severe damage. Stick to a gentle stream from a garden hose.
- Mind Electrical Components: Be extremely careful not to spray water directly onto any electrical wiring, motors, or connections inside the unit.
Step-by-Step Guide to Cleaning Your Outdoor AC Condenser Unit
With your tools ready and safety precautions in mind, you can now proceed with cleaning your outdoor AC condenser unit. Follow these steps for a thorough and effective clean.
- Disconnect Power Safely: Reiterate this vital first step. Turn off your thermostat, then locate the external electrical disconnect box near your AC unit and pull the disconnect or flip the switch. For added security, switch off the appropriate circuit breaker for your HVAC system at your main electrical panel.
- Clear the Surroundings: Start by clearing away any leaves, grass clippings, weeds, or other debris that have accumulated around the base and sides of your condenser unit. Aim for at least two feet of clearance in all directions to ensure optimal airflow. Trim back any shrubs or plants that are growing too close.
- Access the Coils: Using your screwdriver or nut driver, carefully remove the screws holding the protective grille and any exterior panels in place. Some units have a top grille that lifts off, sometimes with the fan assembly attached. Be cautious with any wiring connected to the fan if it needs to be moved; avoid stretching or damaging them. If you’re unsure, consult your owner’s manual or consider leaving fan removal to a professional.
- Remove Loose Debris: Once the coils are accessible, use your gloved hands, a soft-bristled brush, or a vacuum cleaner with a brush attachment to remove large pieces of debris, dust, and grime from the inside of the unit, paying special attention to the coils and the base.
- Straighten Bent Fins: Inspect the aluminum fins for any bent or flattened sections. Use a fin comb to gently and carefully straighten them. This step is crucial for restoring proper airflow across the coils, but be extremely gentle as the fins are delicate.
- Pre-Rinse the Coils: Using your garden hose with a gentle spray nozzle, lightly mist the condenser coils. For best results, spray from the inside of the unit outward. This helps to dislodge some surface dirt and prepares the coils for the cleaner.
- Apply AC Coil Cleaner: Follow the manufacturer’s instructions for your chosen AC coil cleaner. Spray the cleaner generously onto the coils, again, ideally from the inside outward. Allow the cleaner to sit for the recommended dwell time (usually 10-15 minutes) to penetrate and break down the grime. Some cleaners will foam up; this is normal. Ensure the cleaner doesn’t dry on the coils.
- Thorough Rinse: After the cleaner has had time to work, rinse the coils thoroughly with your garden hose, using a gentle spray. Continue to spray from the inside out to push all the dissolved dirt and cleaner residue away from the unit. Make sure all cleaning solution is completely washed off to prevent residue buildup, which can attract new dirt. Avoid spraying directly into any electrical components.
- Allow to Dry: Once rinsing is complete, allow the entire unit, especially the coils, to air dry completely. This might take some time depending on humidity and temperature.
- Reassemble and Restore Power: Carefully reattach all the panels and grilles you removed, securing them with screws. Once everything is back in place, return to your electrical disconnect box and main breaker panel to restore power to your AC unit. Finally, switch your thermostat back to your desired cooling setting.
Common Mistakes to Avoid During AC Condenser Cleaning
While DIY AC condenser cleaning is straightforward, certain pitfalls can negate your efforts or even cause damage. Be mindful of these common mistakes:
- Forgetting to Disconnect Power: This is the most dangerous mistake, risking electrocution or damage to the unit. Always cut power at both the thermostat and the breaker.
- Using a Pressure Washer: High-pressure water will bend the fragile fins, severely impairing airflow and making your unit less efficient than if it were just dirty. It can also damage internal components.
- Bending Fins with Harsh Tools: Using anything other than a dedicated fin comb (or extreme care with a soft brush) can cause irreversible damage to the fins, reducing heat transfer.
- Spraying Electrical Components Directly: Water and electricity don’t mix. Always avoid direct spraying of the fan motor, wiring, or other electrical parts.
- Not Rinsing Thoroughly: Leaving coil cleaner residue on the coils can actually attract more dirt over time or, in some cases, cause corrosion. Ensure a complete rinse.
- Neglecting the Surroundings: Clearing debris directly around the unit is essential, but neglecting to trim nearby foliage allows new debris to quickly accumulate.
Maintaining Your Outdoor Unit for Long-Term Efficiency
Cleaning your AC condenser unit is a fantastic step, but ongoing maintenance habits will keep it running smoothly year after year.
- Keep the Area Clear: Regularly inspect the area around your outdoor unit. Trim back any vegetation to maintain at least two feet of clearance. Clear leaves, grass clippings, and other debris as they accumulate.
- Perform Regular Visual Checks: A quick glance at your unit periodically can help you spot early signs of debris buildup or bent fins, allowing for prompt, minor interventions before they become major problems.
- Consult Your Manufacturer’s Manual: Always refer to your specific AC unit’s owner’s manual for model-specific instructions and recommendations, especially regarding disassembling components or using particular cleaners.
- Consider Professional Tune-Ups: While DIY cleaning is effective, an annual professional HVAC tune-up is still highly recommended. Technicians can perform deeper diagnostics, check refrigerant levels, inspect electrical connections, and clean parts that are not easily accessible to homeowners. This ensures your entire system is running at its absolute best.
Conclusion
Taking the initiative to clean your outdoor AC condenser unit is a smart, empowering DIY project that yields significant benefits. By dedicating a small amount of time to this task, you can dramatically improve your air conditioner’s energy efficiency, reduce your monthly utility bills, extend its operational lifespan, and ensure your home remains a cool, comfortable sanctuary. This simple act of care translates directly into a more reliable and cost-effective cooling system for years to come.
Are you ready to take control of your home’s comfort and efficiency with this essential DIY maintenance?
Frequently Asked Questions
Can I use household cleaners to clean my AC coils?
While mild dish soap mixed with water can be used for light cleaning, it is generally best to use a commercial AC coil cleaner specifically formulated for this purpose. These cleaners are designed to effectively break down grime without damaging the delicate coil materials. Avoid harsh chemical cleaners, as they can be corrosive.
How long does it take to clean an outdoor AC unit?
For most homeowners, a thorough DIY cleaning of an outdoor AC condenser unit typically takes about one to two hours, depending on the level of dirt buildup and how easily the unit’s panels can be removed. This includes preparation, cleaning, and drying time.
What if I can’t remove the top grille or fan?
If you encounter difficulty removing the top grille or fan assembly, or if the wiring seems complex, it’s best not to force it. Many units are designed for easier access to coils without full fan removal. If you cannot safely access the coils, consider clearing as much debris as possible with a vacuum and a gentle hose rinse, or call a professional HVAC technician for assistance.
Is it safe to use a pressure washer on my AC unit?
No, it is not safe to use a pressure washer on your AC unit. The high pressure can easily bend and damage the delicate aluminum fins, which are crucial for heat transfer. Damaged fins restrict airflow and significantly reduce your unit’s efficiency. Always use a standard garden hose with a gentle spray nozzle.
How often should I call a professional for AC maintenance?
Even with regular DIY cleaning, it’s highly recommended to schedule a professional HVAC tune-up at least once a year, preferably before the peak cooling season. Professionals can perform comprehensive checks, address complex issues like refrigerant levels, inspect electrical components, and perform deeper cleaning that extends beyond what is typically done in a DIY session.